
Teeth Whitening Before and After: Photos, Shades & Results
Quick answer: Professional teeth whitening typically brightens natural teeth by several shades, lifting stains from coffee, tea, wine and tobacco. In-office whitening shows a visible change in one visit, while custom take-home trays work over one to two weeks. Crowns, veneers and fillings do not whiten, so we plan around them, and results last longest with regular cleanings.
What Teeth Whitening Before After Results Can You Realistically Expect?
Teeth whitening before after results can be noticeable, but the best outcome is a healthier-looking, natural off-white smile - not a fake, paper-white color. Professional whitening often improves teeth by about 4 to 8 shades, while some patients with strong surface stains may see larger changes. Your final result depends on your starting shade, the cause of discoloration, your age, and whether you have crowns, veneers, fillings, or implants.
Before choosing a treatment, ask a dentist to:
Check for cavities, gum disease, exposed roots, and worn enamel.
Identify whether stains are extrinsic (on the surface, often from coffee, tea, tobacco, or red wine) or intrinsic (inside the tooth, often related to aging, injury, or certain medications).
Record your starting shade with photos or a shade guide.
Plan whitening before new visible crowns, veneers, or bonding, since dental materials do not whiten.
A one-visit professional treatment may create a rapid change, while dentist-supervised take-home trays usually brighten teeth more gradually over days or weeks. Store-bought strips, paint-on gels, and whitening rinses can help with mild surface staining, but typically produce smaller changes. Teeth can also look extra bright right after treatment because they are temporarily dehydrated; the more accurate final shade is usually clear after the teeth rehydrate.
Whitening works best on yellow or brown staining. Gray discoloration, deep tetracycline or minocycline staining, white decalcification spots, and old dental work may respond unevenly or not at all. In those cases, I help patients compare whitening with options such as bonding, crowns, or veneers when a more even result is the real goal.
I am Justin Wright, DDS, founder of Just Wright Dental and Implant Center in Corsicana, Texas, and I have spent 18 years helping patients make thoughtful cosmetic and restorative decisions, from teeth whitening before after planning to full-mouth smile reconstruction. My approach is simple: treat the patient, not just the teeth, and build a plan around what will look natural, feel comfortable, and hold up over time.

Real Teeth Whitening Before After Expectations and Shade Guide Changes
When reviewing a genuine teeth whitening before after gallery, it helps to understand how cosmetic dentists objectively measure color transformation. We use standardized clinical shade guides, such as the VITA classical scale, which categorizes tooth shades into four primary color families (A for reddish-brown, B for reddish-yellow, C for gray, and D for reddish-gray) arranged from lightest to darkest.

In professional treatment, shade improvements typically range from 4 to 8 shades lighter. However, evaluating results immediately after a chairside session requires a bit of patience. During treatment, the tooth loses moisture, creating temporary enamel dehydration that makes the teeth look artificially bright or chalky. Within 48 hours to a week, as natural saliva restores mineral balance and moisture to the enamel pores, the true, stabilized shade emerges.
Natural Tooth Anatomy and Baseline Enamel Shades
A natural, healthy human tooth is not solid white like a sheet of printer paper. The outer layer, known as enamel, is a semi-translucent crystalline structure. Beneath the enamel lies dentin, a denser, naturally yellowish-to-bone-colored tissue that makes up the bulk of the tooth.
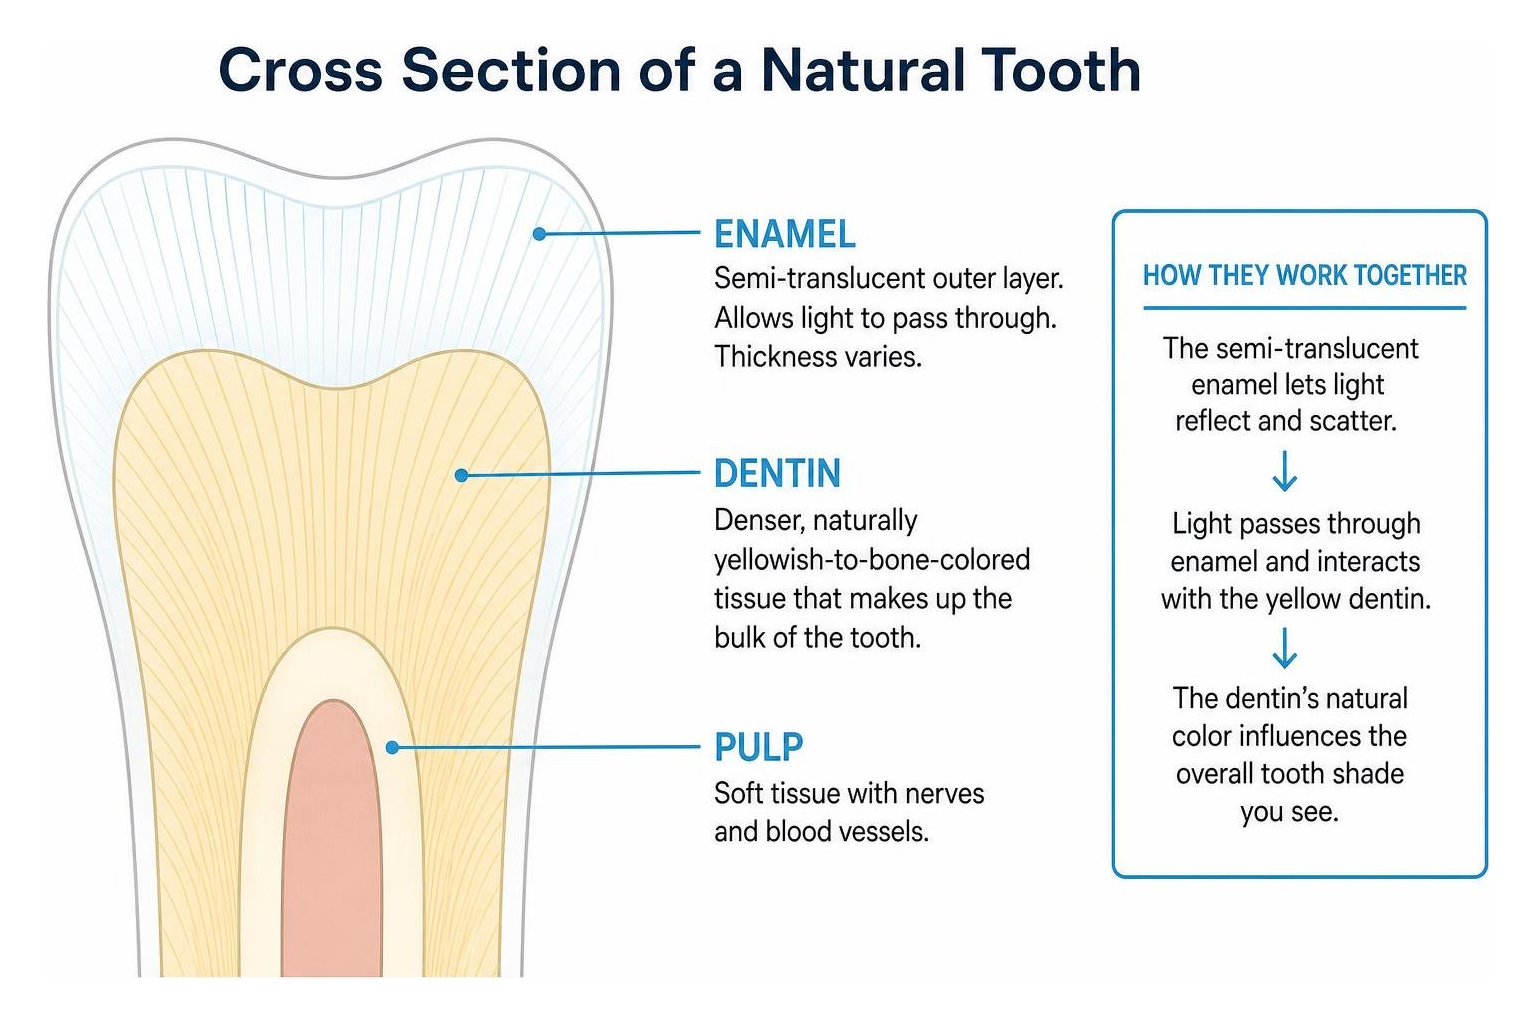
Several anatomical factors dictate your baseline shade:
Enamel Thickness and Translucency: Thicker enamel reflects more light, while thinner enamel allows the deeper yellow dentin to show through.
Age-Related Changes: As we age, enamel naturally thins from decades of micro-wear, and the underlying dentin gradually thickens and darkens, shifting baseline smiles toward a deeper yellow or amber hue.
Evaluating In-Office Teeth Whitening Before After Transformations
Professional in-office whitening utilizes high-concentration hydrogen peroxide gels (often 25% to 40%) that are carefully applied under direct clinical supervision. The active chemistry works through an oxidation reaction: the peroxide penetrates microscopic enamel prisms, breaking the chemical bonds of complex stain molecules and converting them into colorless compounds.

Because the gums and sensitive soft tissues are isolated with a protective liquid barrier, we can apply potent active formulas safely. This allows significant stain breakdown in about an hour. You can see how this process dramatically clears heavy surface discoloration in this visual transformation of stained to bright teeth, restoring natural brightness in a single visit.
Comparing Professional Systems and At-Home Options
Choosing between professional in-office care and at-home treatments depends on your timeline, comfort preferences, and dental anatomy. Rather than navigating a dozen confusing products, it helps to compare the two primary professional approaches directly:
Feature | In-Office Professional Whitening | Dentist-Supervised Take-Home Trays |
|---|---|---|
Primary Active Agent | High-concentration Hydrogen Peroxide (25%–40%) | Moderate-concentration Carbamide Peroxide (10%–22%) |
Treatment Speed | 1 chairside visit (~60 minutes) | Daily wear over 1 to 2 weeks |
Average Shade Shift | 4 to 8+ shades lighter rapidly | 4 to 6 shades lighter progressively |
Gum Protection | Light-cured resin barrier applied chairside | Custom-scanned, scalloped precision trays |
Best Suited For | Fast results for events, heavy extrinsic stains | Sensitive teeth, gradual control, at-home convenience |
At-Home Teeth Whitening Before After Comparisons and Durability
Dentist-supervised take-home kits provide a controlled, gradual transformation. We capture a digital scan of your mouth to create custom-fitted trays that hold the carbamide peroxide gel against your enamel while preventing it from leaking onto your delicate gum tissue.

Over-the-counter whitening strips and paint-on gels represent a lower-concentration alternative. While store-bought strips can produce a 1 to 2 shade shift for minor surface stains, generic strips cannot match the anatomical fit of custom trays. Store strips frequently slip, causing patchy results near the gumline or temporary gum irritation from unprotected gel contact.
Treatment Candidacy Across Extrinsic and Intrinsic Discoloration
Understanding why your teeth discolored in the first place determines how responsive they will be to peroxide treatments:
Extrinsic Stains: Located on the outer enamel surface, caused by coffee, black tea, dark colas, red wine, curry, and tobacco. These stains respond exceptionally well to both in-office and tray-based bleaching.
Intrinsic Stains: Located deep within the dentin core, caused by early childhood antibiotic use, trauma, excessive fluoride intake during development, or natural biological aging. These deeper structural discolorations require longer, customized protocols or restorative alternatives.

Managing Limitations, Difficult Stains, and Existing Restorations
Whitening is a wonderful conservative treatment, but peroxide chemistry has biological boundaries. During clinical examinations, I evaluate whether a patient's expectations can be met with chemical brightening alone, or if restorative cosmetic dentistry is necessary to achieve their desired smile.

Reviewing a professional dental whitening shade comparison helps demonstrate why a uniform result across natural teeth and restorations requires careful clinical sequencing.
Challenging Discoloration: Tetracycline, Gray Stains, and Decalcification
Certain dental conditions do not respond to standard whitening chemistry:
Tetracycline and Minocycline Staining: Antibiotic integration into the dentin matrix creates dark gray, brown, or horizontal banding. While extended tray wear (months rather than weeks) can lift some darkness, full correction often requires handcrafted porcelain veneers.
Gray Hue Resistance: Teeth with natural gray undertones bleach far more slowly and unpredictably than teeth with yellow or brown undertones.
Enamel Decalcification & Fluorosis: White chalky spots or post-orthodontic mineral loss do not turn into normal enamel during whitening. Instead, peroxide whitens the surrounding tooth structure while temporarily making the white spots appear brighter and more noticeable.
The Impact on Crowns, Fillings, and Veneers
Peroxide whitening agents react only with organic tooth structure; they cannot penetrate or lighten inorganic dental porcelain, zirconia, or composite resin bonding.
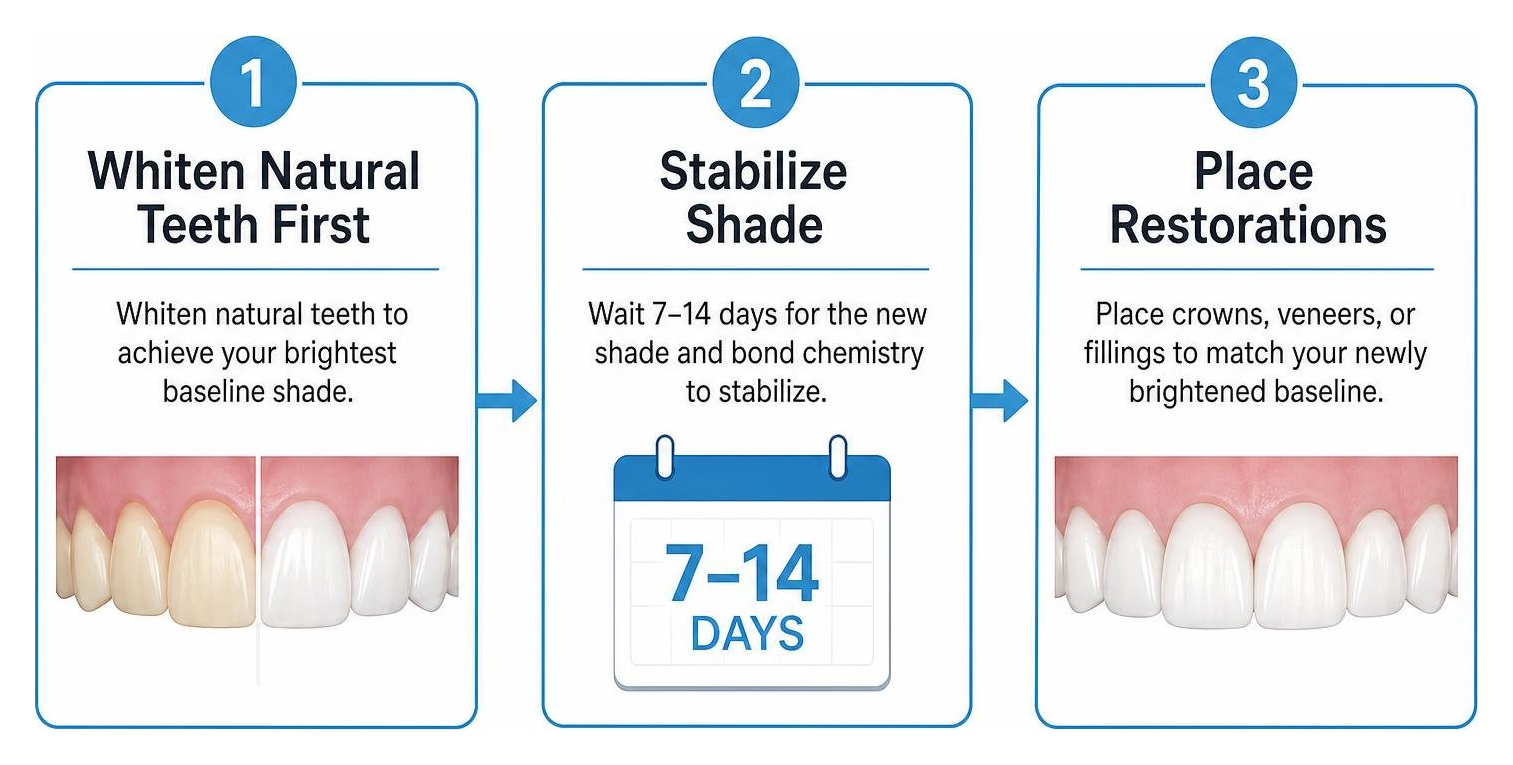
If you have existing tooth-colored fillings or crowns on your front teeth, whitening the surrounding natural enamel will cause an obvious color mismatch. Furthermore, peroxide temporarily lowers the adhesive bond strength of dental resins. For patients planning comprehensive smile updates, I recommend completing all whitening first, waiting 7 to 14 days for the new enamel shade and bond chemistry to stabilize, and then placing custom restorations that match your newly brightened baseline perfectly.
Protecting and Maintaining Whitened Smile Results
The first 48 hours following professional whitening represent a critical window. The bleaching treatment temporarily strips away the salivary pellicle—a natural, protective protein film on your enamel—leaving microscopic enamel pores open and highly vulnerable to pigments.
Following simple maintenance guidelines helps your smile transformations stay radiant for years rather than weeks:
Follow the 48-Hour "White Diet": Avoid any food or beverage that would visibly stain a white cotton shirt (coffee, tea, red wine, soy sauce, tomato paste, blueberries). Focus on clear liquids, water, poultry, white fish, rice, cauliflower, and peeled potatoes.
Protect with Smart Habits: When drinking iced coffee or tea after the initial 48-hour window, use a straw to bypass the front teeth, and rinse your mouth thoroughly with water afterward.
Use Touch-Up Trays: Using custom take-home trays for one or two nights every 6 to 12 months easily clears away newly accumulated surface stains.
Managing Post-Whitening Sensitivity and Enamel Hydration
Mild, temporary tooth sensitivity can occur when peroxide diffuses through enamel tubules to stimulate the inner nerve pathways. This sensation is transient and resolves as the teeth naturally rehydrate.
To ensure patient comfort:
We apply desensitizing agents containing potassium nitrate or amorphous calcium phosphate chairside.
We recommend using a sensitivity-formulated toothpaste for two weeks before and after whitening.
If using take-home trays, we can reduce wear time from 60 minutes to 30 minutes daily to keep the experience gentle and comfortable.
Dietary Guidelines and Daily Oral Hygiene Protocol
Long-term shade stability depends on daily preventive care. Brush twice daily with a soft-bristled brush and non-abrasive fluoride toothpaste, and maintain daily flossing to prevent dark stains from taking hold between teeth. Routine professional dental cleanings every six months remove calcified tartar that normal home brushing cannot touch, keeping your enamel clean and light-reflective.
Frequently Asked Questions About Teeth Whitening Results
How long do professional teeth whitening results last?
Professional whitening results generally last between one and three years. The ultimate duration depends on your daily lifestyle choices, such as your consumption of dark beverages, tobacco use, and oral hygiene discipline. Patients who perform minor touch-ups at home with custom trays every 6 to 12 months can maintain their brighter shade for much longer.
Why do teeth look slightly darker a week after in-office whitening?
Immediately following an in-office appointment, teeth are dehydrated from isolation and air drying, making them look bright and slightly opaque. Over the following 48 hours to seven days, the enamel naturally absorbs moisture from your saliva. This rehydration process settles the teeth into their true, stable, and natural-looking final shade.
Can teeth whitening lighten dental crowns or composite fillings?
No. Peroxide whitening solutions only oxidize stains within natural enamel and dentin. Inorganic materials like porcelain crowns, veneers, and composite fillings will not change color. If your existing dental work is visible when you smile, we coordinate treatment so your natural teeth are whitened first, followed by updating old restorations to match your new shade.
Conclusion
A radiant, confident smile is built on careful planning, healthy foundations, and realistic aesthetic expectations. Whether you are seeking a subtle refresh for an upcoming milestone or planning a comprehensive smile makeover, our team at Just Wright Dental and Implant Center in Corsicana, Texas, is here to guide you through every step.
We invite you to explore our before and after smile transformation gallery to see real patient results, or book an appointment for a personalized consultation. Spending a brief moment to evaluate your oral health and map out your smile goals is a rewarding investment in your long-term confidence and health.
More Patient Guides
Emergency Dentist Guide · Before and After Gallery · What Causes Bone Loss Around Implants · Broken Implant Screw Removal · Do I Need a Bone Graft? · How to Fix Jaw Bone Loss · Implants With Gum Disease · Crooked Teeth Before and After · Signs of Implant Rejection · Denture Options Explained · All-on-X Implants · Same-Day Full Arch · All-on-4 Implant Dentures · Denture Smile Makeover · Walk-In Emergency Dentist · Recognizing Failed Implant Work · Blue Cross Blue Shield and Implants
Explore Our Care
Dental Implants · Smile Transformations · Dentures · Cosmetic Dentistry · Emergency Dental Care · General Dentistry · Smile Gallery · About Dr. Wright · Free Smile Assessment · Book an Appointment